From HelL, Oh Dear!... To HelLO, Dy-no-mite!
Automatic Polygon Reduction Tools may promise quick results, yet often the visual outcomes are less than heavenly. Avoid hellish results by following these simple guidelines listed below:
1. In The Beginning
The ideal LOD swapping system crossfades the higher LOD mesh to the lower LOD mesh. Both meshes fade reciprocally, from 100% to zero visibility on one mesh, and from zero to 100% on the other. The blending of meshes appears smooth. Such a system is processor heavy and framerate suffers horribly.
Fortuante teams will not have LOD blending removed completely, but will retain half of the process. Lets look at how single direction LOD blending works, and how artists can make the most of the process.
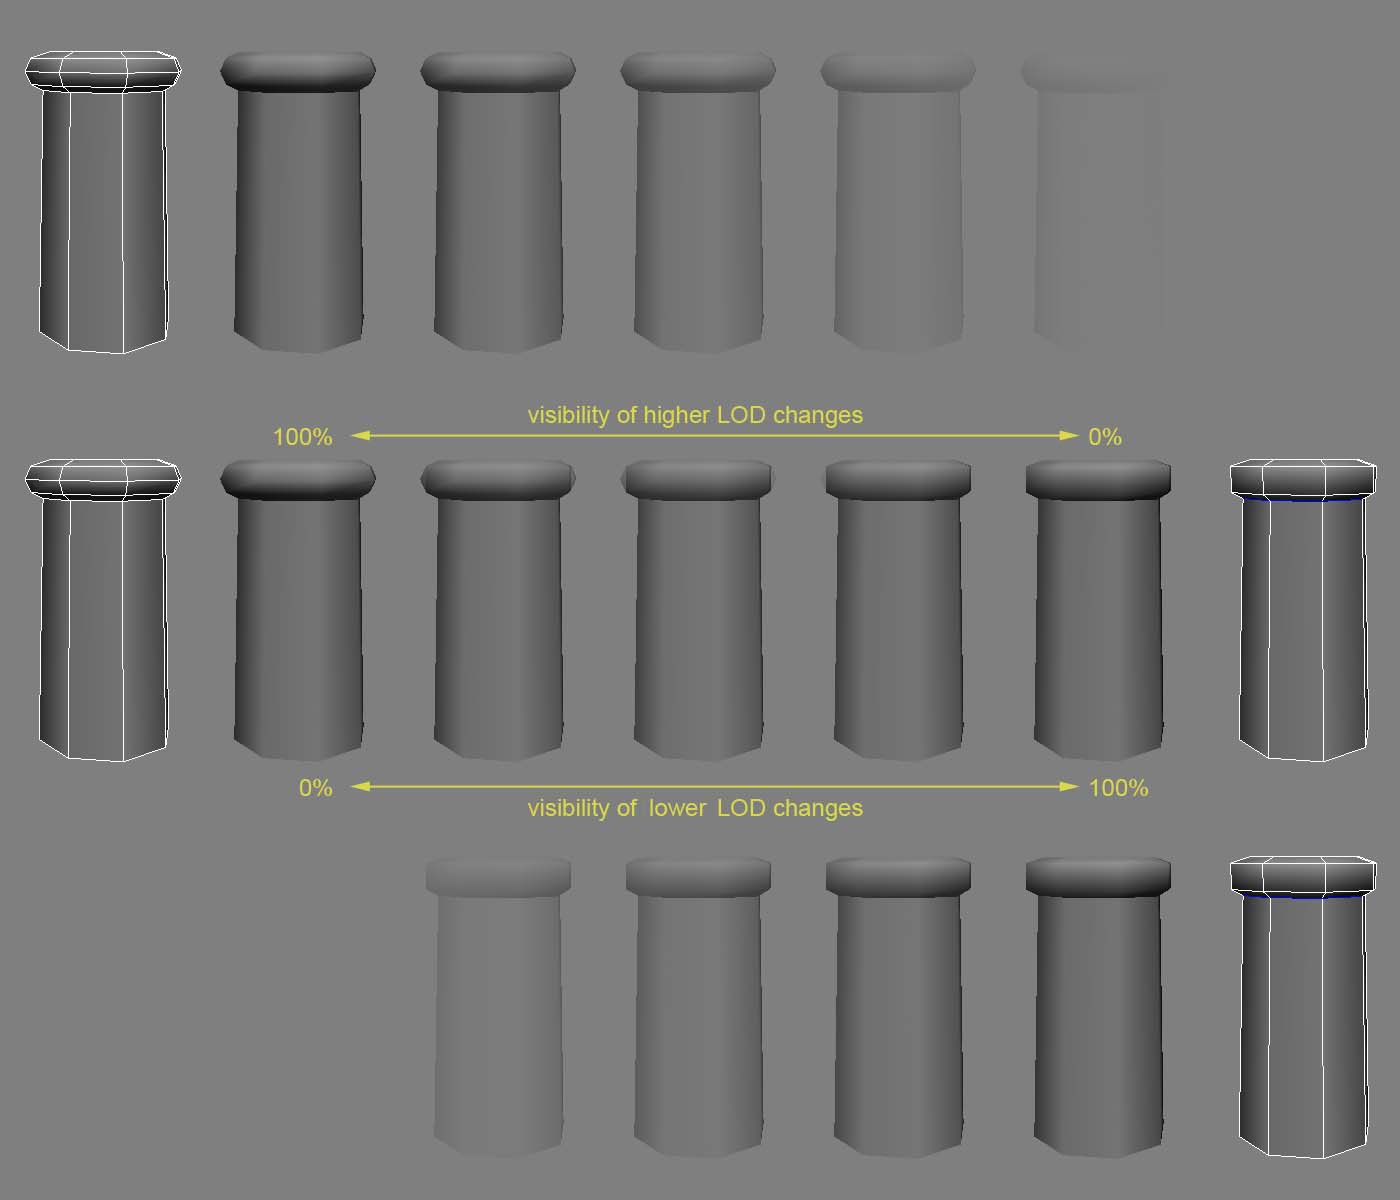
2. Thy Cup is Half Full

In the single direction blending system, at the instance an LOD swap begins both meshes have 100% visibility. If the lower LOD was created properly, no visible change should be seen at this point. As the blending progresses, the higher LOD's visibility gradually decreases to reveal the lower LOD inside. Every vertices of the lower LOD must be completely contained within its higher sibling. No points may extend past the shell of the higher. If any points poke beyond the shell of the higher, "popping" or flickering will occur.
3. Rule of Russian Dolls
Collapsing edges and deleting points in a haphazard fashion will guarantee you a slow painful death on top of an eternal suffering in hell. Proper care must be taken so that your polygon reduction work does not cause any piece of your lower mesh to poke through its higher sibling. The best LODs fit wholly and completely within its higher sibling.


Collapsing edges can greatly change the silhouette that define the shape of the original mesh.

Viewing both meshes together show the lower mesh poking out beyond its higher sibling. This must be avoided.
 |
| The lower LOD eclipsing the higher completely negates the blending process. |

Deleting edges is the preferred method to reduce points.

Here is the 3rd LOD that strictly follows the Russian Doll Rule.

Deleting another edgeloop would be the most ideal. We attempt to do this by first scaling out the top vertices so that edges running vertically on our cylinder change position as little as possible.

When checked with the previous LOD we notice that we've broken the Russian Doll Rule.
Because polygon reduction is our top priority we choose to keep LOD 3, and we fudge the shape of LOD 2 to keep in line with our rule.
We snap the top vertices of LOD 2 to match LOD 3.

We do the same with LOD 1.
Viewing all 3 together we see a very good set of LODs that will blend nicely.
4. Concave Shapes

When reducing points on a concave shape you must take care to change edge positions as little as possible. Deleting edges alone will not always work in every case.

Deleting these edges causes the hole to shrink and our new mesh breaks the Russian Doll Rule.

Moving the edges to match the position of the original edges is the way to go.

But we are not quite done yet. When viewing our meshes together we notice flickering of polygons, even though no portions of LOD 2 poke out beyond LOD 1.
This flickering is caused by a soft/hard edge conflict between our 2 meshes.


The flickering is fixed by marking the edges of LOD 1 <hard> to match the shading of LOD 2.
We check our work again by viewing the 2 meshes together. Everything looks swell.
5. Jagged Shapes

Lets apply what we've learned thus far to a mesh that is both concave and convex.

Here is a bad attempt at deleting edges.

No Russian Doll here.

This reduction is ok.

And it abides by the Russian Doll Rule just fine.
But something tells me we have it in us to do better.

The deletion of these edges looks very efficient. Optimization is our focus here.

Except we've broken the our golden rule.

We fix this by going back to LOD 1 and adjusting the vertices there.

That is one righteous LOD set!
6. Book of Tesselations
Do you continue to have flickering and polygon fighting even when your faces share the same plane? Is there any end to this sibling rivalry, you say? There is an end, and it lies in the book of tesselations.

Here is our original mesh.

We know from previous lessons that this reduction of points is wrong.

And this is the right path.


Yet we continue to see flickering when blending LODs.
Upon inspection we see that the tesselation of our faces don't quite match between our 2 meshes.
We flip our edges so that LOD 1 is as close to LOD 2 as possible.

With matching tesselation, coplanar polygons no longer fight.
7. In Summary
The one requirement often given to artists for the blending to work properly is that the lower LOD mesh must be smaller that the higher LOD. While this rule is entirely accurate, it fails to convey many important details about the mesh that are often overlooked. Vertex positioning, hard/soft edges, and tesselation are factors that can make or break your LODs.
Automatic polygon reduction tools and the process of collapsing edges are often the quickest way to reduce points, but they nearly always lead to results that completely nullify the blending effect. Take care to reduce points strategically. Careful work will save you from future pain and suffering.

